

How To Fix The Boat Clear Coat
Topside Gelcoat Repair
Repairing scrapes in your hull isn't as difficult as yous'd retrieve. Here's how to make a seamless repair on vertical surfaces.
My Grand Banks 32, Seaglass, is in good condition for her age. But over the course of her 30-year lifespan, she's suffered a few bumps and bruises, all now successfully repaired. What was in less-than-stellar shape, however, were the sides of the flybridge that one time had a plethora of antennas and other equipment, since removed, leaving behind some ugly holes and previous weak attempts at repair.
Repairing gelcoat and so that information technology blends into the original is non hard given the right mindset, tools, and materials. But making repairs to vertical surfaces presents some unique challenges. Elevation of the listing is that you're fighting gravity. Merely at that place are several ways to overcome this trouble, and the verbal approach depends on the size of the repair.
Safety Talk
Protect yourself, especially from dust and fumes. Use common sense, and read and understand all the safety instructions that come with your tools and materials. The gelcoat catalyst is peculiarly noxious; avert breathing in the fumes. Article of clothing a respirator and disposible gloves. If you get gelcoat on your peel, wash it off correct abroad with soap and water.
In the article "Easy Gelcoat Repairs", I outlined the basic steps needed to perform an invisible repair to gelcoat on the cabin top. Undertaking a small repair on a horizontal surface, such as the one outlined in that article, is a great way to gain confidence and strop your skills earlier moving on to a repair that is more than conspicuous, like on the hull topsides or flybridge.
Technical Support
Degree Of Difficulty: Moderate to difficult
Tools and Materials:
- Respirator
- Latex or nitrile gloves
- Mixing sticks, cups
- Plastic spreader
- Foam brush
- Waterproof annoying paper in various grits from 120 to 600
- Sanding block
- Random-orbit sander & extension cord, if needed
- Acetone
- Gelcoat (plus tinting, if needed)
- Newspaper towels/lint-gratis rags
- Mylar sheet
- Chemical compound and polish
- 3" plastic shipping tape (3M Scotch or similar)
Time: Nigh 3 hours plus curing.
Cost: About $l for materials, non including gelcoat & tinting.
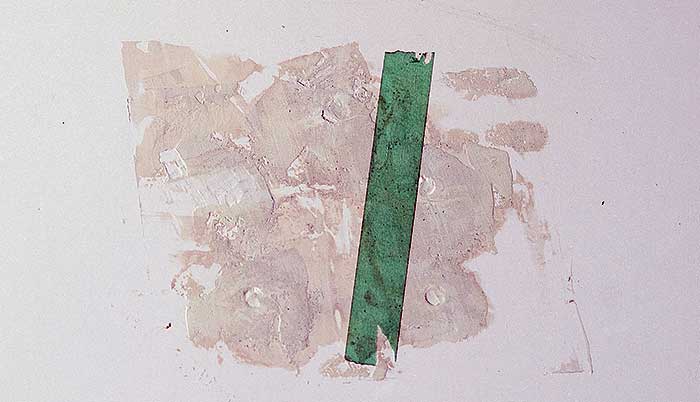
1. The sides of the flybridge are structurally audio but looking crude. The previous owner had hastily filled holes with epoxy filler and left them. The first thing I need to do before I get-go the repair is to carefully launder the area I'grand working on.
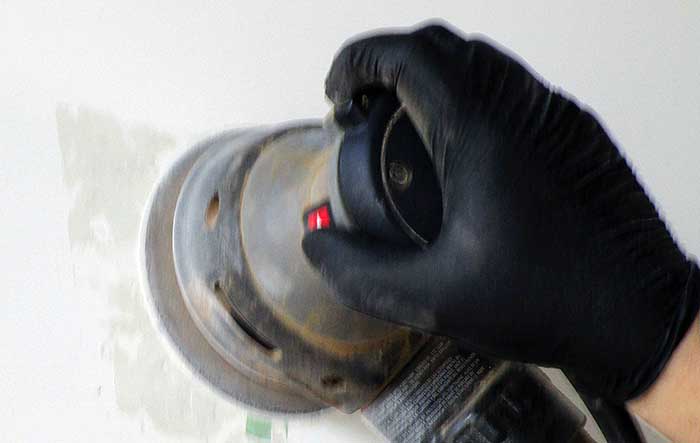
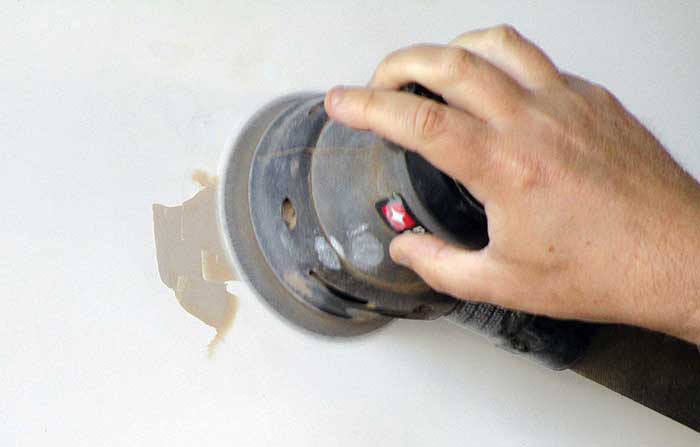
2. I offset by sanding down the previous poor repair to bring it flush with the surrounding surface. I used a random-orbit sander with 180 grit abrasive paper. You tin can sand it by hand, but it will take longer.
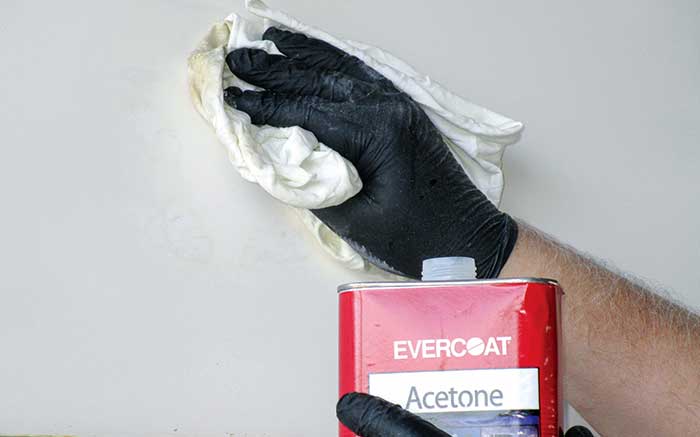
3. Wipe down the area with acetone to clean off any residue, such as wax, that would interfere with the repair.
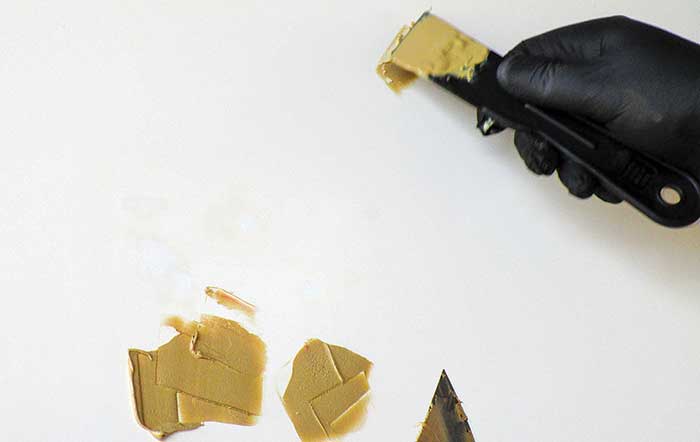
4. Fill any holes. If they're small or shallow, you tin can use some thickened gelcoat.The ones on my boat are ane-quarter inch bore, so I apply epoxy filler, which has the consistency of peanut butter. Force the filler into the holes using a putty pocketknife. Leave the filler a little proud of the surrounding surface so that you accept something to sand down level with the existing gelcoat, but don't overdo this. A further application of filler is oft preferable to overfilling any hole or repair, peculiarly if it's large, as this avoids sagging or unnecessary sanding of the very hard epoxy in one case cured.
v. Leave the filler to cure overnight, and so apply a random-orbit sander with 120-grit paper to sand the filled holes flush and fair with the surrounding gelcoat surface. If needed, apply more filler. (Not shown: If, afterwards sanding, at that place are still some small holes, fill up them using some two-role all-purpose surface filler formulated explicitly for fiberglass repairs, such as Interlux Interfill 833. Subsequently mixing following the supplied instructions, apply the filler with a plastic spreader, applying no more than necessary to minimize the amount of sanding needed.)

six. Before you apply gelcoat, go the surface perfectly smooth. Although information technology's tempting to utilise a ability sander for this, doing so tin create ridges in the surface. Instead, sand by hand using 120-grit abrasive paper wrapped around a block, pausing frequently to run your fingertips over the repairs to check progress.
Switch to 320-grit wet/dry paper used wet. With the paper wrapped around a block, frequently dip information technology into a bucket of clean water, which keeps the paper clean and lubricates the abrasive, making for faster work and a smoother finish. Apply moderate pressure level to the annoying paper until all scratches from the coarser paper accept disappeared.
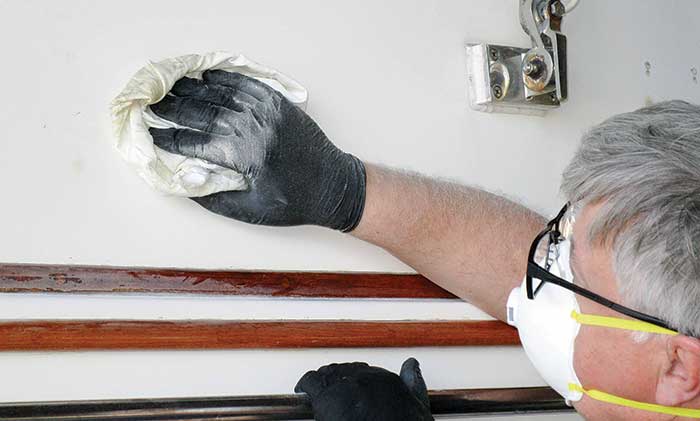
seven. One time the surface is smooth and free of imperfections, wipe down the surface with a lint-gratuitous textile dampened with acetone. Turn the cloth frequently and wipe, in one direction only, to remove any surface contagion that might impact the gelcoat that you utilize.

viii. Mix the gelcoat according to the manufacturer's instructions. How much is needed depends on the size of the repair. It'due south better to mix upwardly a footling as well much than non enough. Work swiftly. Once catalyzed, you only accept most 10 minutes of working time before it starts to harden.
Tip
Shining a brilliant light at a low angle across the repair expanse will assist you spot any dips and bumps in the finish.
Getting a good color match is one thing that causes feet among newbies. The best approach is to buy gelcoat from your boat manufacturer then you'll know it volition exist a perfect friction match. If this isn't possible, buy clear gelcoat and add together some tinting pigments a little at a time until you attain the right match.
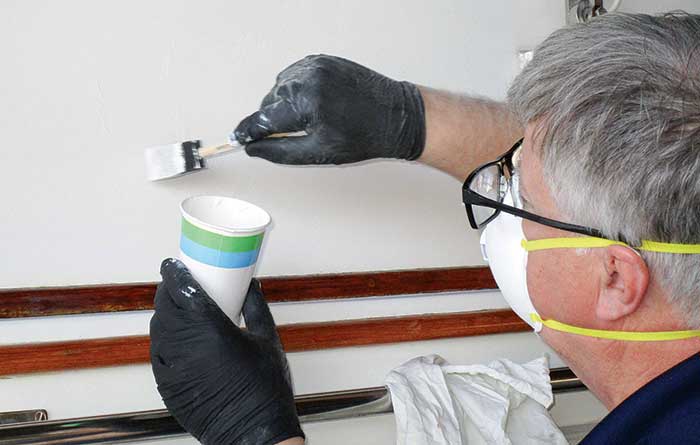
nine. To apply gelcoat, you take two choices: brush or spray. The easiest method for well-nigh folks is to brush on the gelcoat, which is what nosotros are showing hither. Use a good quality castor. Cheap "scrap"-style brushes, oft used for polyester resins and other tasks, shed hairs, marring the end. A meliorate pick is either the same style and quality of brush you would utilize for, say, painting the trim of a firm, or a foam brush that tin can simply exist tossed once the job is complete.
For many repairs, a single glaze is oftentimes sufficient, but for deep gouges and other significant damage, the gelcoat sometimes needs a more substantial coat. Either use multiple thin coats or a Mylar covering (available from stationery stores), as I did, to preclude sagging. (See "Get The Gelcoat To Stay Put" below.)

ten. After leaving the gelcoat to fully cure overnight, remove the Mylar covering.

xi. Wet sand the repair to seamlessly blend the new gelcoat into the original. Use 240-dust followed by 400-grit abrasive before finishing off with 600-grit. To prevent ridges, wrap the paper effectually a block.
As in the prep stage, bank check the repair with your fingertips to feel for any imperfections. Frequently wipe the surface area using a rag to monitor progress. As an added check, sight across the surface from several angles with the side of your head almost touching the surface. Whatsoever undulations are easiest to spot this way.
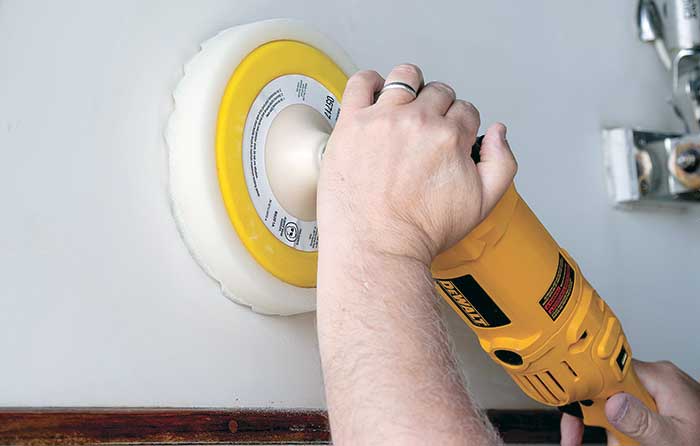
12. Satisfied with the surface? Then use a fine cut compound with a wool pad to finish off before applying a good quality wax to protect the surface and prolong the smoothen.
Become The Gelcoat To Stay Put
In many respects, gelcoat is similar to paint. As it needs to exist applied in a somewhat thicker layer than paint, however, it is predisposed to run, sag, and not stay where you desire it. In that location are several things you can do to prevent this from happening.
one. Apply several thinner coats instead of one thick coat. You'll need to lightly wet sand between coats to remove any surface wax and wait for each coat to cure. Building upwardly a decent thickness, especially if you lot take a deep gouge, could accept some time.
2. Thicken the gelcoat. Some experts suggest thickening gelcoat to a paste consistency with the addition of some form of filler pulverization. West system 410 microlight filler powder is i pop option. This helps, only any filler is likely to affect the gelcoat color and can brand the surface more than porous than the surrounding original gelcoat.
iii. Employ some sort of embrace to help hold information technology in position. For pocket-size jobs, such every bit repairs to hairline cracks, a piece of plastic shipping tape, of the blazon mentioned earlier in this commodity, is a bully pick. After applying the gelcoat, stretch a length of tape beyond the repair sticking it downward to the adjacent audio gelcoat. For larger repairs, clear Mylar film, available from role supply stores, is an splendid choice as it can be lightly squeegeed into the still-wet gelcoat giving a shine finish. By removing the air, there are no problems with any waxy surface.
After curing, both Mylar and record can exist easily removed.
Related Articles
Writer
Mark Corke
Contributing Editor, BoatUS Magazine
A marine surveyor and holder of RYA Yachtmaster Bounding main certification, BoatUS Magazine contributing editor Marking Corke is i of our DIY gurus, creating piece of cake-to-follow how-to manufactures and videos. Mark has built v boats himself (both ability and sail), has been an experienced editor at several elevation boating magazines (including onetime associate editor of BoatUS Magazine), worked for the BBC, written four DIY books, skippered two round-the-globe yachts, and holds the Guinness World Record for the fastest there-and-back crossing of the English Channel — in a kayak! He and his wife have a Thou Banks 32.
BoatUS Magazine Is A Benefit Of BoatUS Membership
Membership Benefits Include:
-
Subscription to the print version of BoatUS Magazine
-
4% dorsum on purchases from West Marine stores or online at WestMarine.com
-
Discounts on fuel, transient slips, repairs and more at over 1,200 businesses
-
Deals on cruises, charters, automobile rentals, hotel stays and more than…
-
All for simply $25/year!

How To Fix The Boat Clear Coat,
Source: https://www.boatus.com/expert-advice/expert-advice-archive/2018/august/topside-gelcoat-repair
Posted by: stilesallagarl.blogspot.com
0 Response to "How To Fix The Boat Clear Coat"
Post a Comment